Tag

FABRIC

Browsing

Curtains are the ultimate nesting project.  Not only do they finish off a room, but they keep out drafts and provide privacy.  And lined curtains are even cozier.  Making curtains is not as hard as it may seem.  If I can do it, so can you — I promise.  All it takes is some skill in measuring, a good plan and the ability to sew a straight line.

Most curtain panels are just rectangles.  So you need to know two things:  the width and the height of the panel that you’ll be making.  And that means knowing a little bit about the measurements of your window.

For these kinds of projects, I always count on a trusty diagram.  I don’t pull out the graph paper — any scrap will do.  The key is to measure carefully.

I have three windows that I’ll be covering, but they’re all the same size and shape — so one drawing would do it.  My goal was to determine the height and width of the finished curtains.  Then I could take those dimensions to figure out how much fabric to cut.

(Yes, that’s a giant coffee stain. It was Saturday morning — early. But I didn’t get the coffee on anything else.)

I wanted floor-length curtains, so I measured from the top of the curtain rod (or where that rod would be) to the floor.  Then I needed to take into consideration the curtain rings.  I’m lazy — give me a break, lined curtains are enough work! — so I chose to use clip-on curtain rings.  (In my drawing, those are the little circle things at the top of the window.) That added about 2″ to the hardware at the top of the curtains, but meant I wouldn’t need to sew tab tops or button holes or a pocket for a curtain rod.  (Besides I like the look.)

The measurement from the floor to the top of the rod is 92″, so the finished curtain panel would need to be 90″.  (92″ – 2″ = 90″)

Now for the width.  There is all sorts of advice for this measurement, but most sources say to make a curtain panel like I was planning, each one should at least 1.5 to 2 times as wide as the window itself.

But threw that advice out of the window.  As I described on my guest post for Harmony Art on Wednesday, I felt the design of the fabric was strong enough that I didn’t need more than around 34″ for each panel width.  This had another benefit: because the fabric I was using was 110″ long, I only needed one yard of fabric per panel.

(Did you see what I just did there?  I broke the rules!  Being a grown up is really freeing.)

So, now I had my finished fabric width and length, but that’s not how much fabric I would cut.  Nope, I have to consider the hems, unless I was okay with frayed edges.  (I’m not.)  And that required a second diagram.

Notice that there are two rectangles here: The larger one is for my curtain fabric. The smaller one represents the lining.

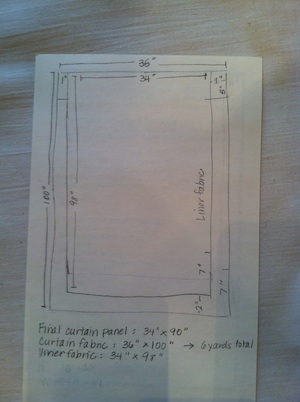
Basically, I have two rectangles here. The larger one is my curtain fabric.  The smaller one is my lining.  If you think of this diagram as looking at the back of the curtain, that will make sense.

The ultimate goal was to figure out how much fabric I needed to cut — based on the finished size of the curtain panel.  So what I ended up doing is adding to the finished panel size.  Here’s the basic formula for the length:

top hem + finished panel + bottom hem

For my design, that meant:

5″ + 90″ + 5″ = 100″

(Ignore the 7″ measurements at the bottom of the drawing.  They should have read 5″.)

Same goes for the sides:

left hem + finished panel + right hem

1″ + 34″ + 1″ = 36″

Ta-da!  I now know what size to cut my curtain fabric: 100″ x 36″

The lining is a bit different.  I want the top edge of the lining to line up with the curtain fabric.  This way, the top of the curtain is sturdy enough for the curtain clips.  But the sides should be smaller, to allow for the little “frame” of curtain fabric all the way around.  An added benefit is that I don’t have to hem the lining fabric at all — the rough edges will just tuck inside the curtain fabric hem.

Lining length: 100″ – 2″ = 98″

Lining width: 36″ – 1″ – 1″ = 34″

If I’ve done my math correctly, the only thing left to do is cut, iron and sew!

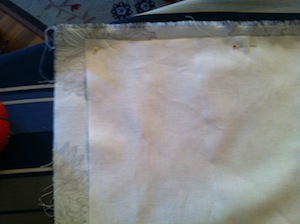
This is the lining pinned to the curtain fabric. (The top doesn’t match up perfectly because of the selvedge, or manufactured edge, of the curtain fabric.)

Starting the top hem of the curtain (upside-down). First I fold the rough edge over and iron.

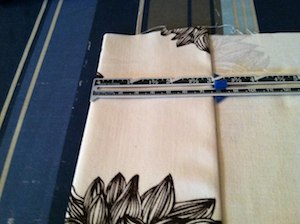
… Then I fold over to tuck in the rough edges of the fabric and make the finished hem.

After a few hours of cutting and ironing and ironing and ironing and sewing and ironing, I finally had two finished curtain panels:

So I’m already looking at my mistakes. This weekend I’m going to revisit at that right panel, which seems a bit long. I’ll probably take out the top hem and re-do it.

The diagrams made all the difference in the world with this project.  Without them, I would have had a terrible time visualizing what I needed.  And honestly, that little bit of math was much easier than the sewing (and ironing and ironing and ironing and ironing).

When have you used a diagram to help you solve a problem or complete a project?  Share your experience in the comment section!

So you’re buying fabric for a project. Whether you’re doing the sewing yourself or sending it out to a professional seamstress, tailor or upholsterer, the width of the textile is a big consideration.

Fabric is typically sold by the yard, and it’s manufactured in standard widths, usually ranging from 40 inches to 110 inches.  The wider the material, the more area you’ll actually take home per yard. (There’s more to consider here, including the way the pattern runs and the grain of the fabric.  But we’ll save those details for another post.)

Naturally, wider fabric also sports a higher price tag per yard.  And doing the math can help you figure out if it’s a good deal or not.  That’s why textile designer Harmony Susalla asked me to write a guest post for her blog.  A snippet appears below.  Read the rest on Harmony’s site.

When you’re a complete fabric junkie like I am, you’re always looking for a bargain.  Of course, my eye is drawn to gorgeous designer fabrics with really high thread count. Swoon!  But the cost—well, that can bring on a real fainting spell.

That’s why I started out sewing with fat quarters.  I found fabrics that I loved—and could easily afford—and figured out really cool things I could make with them.  Little, zippered change purses, box-bags for balls of yarn and knitting needle rolls.  I sewed and sewed and sewed.  And I was very happy.

Until I started eyeing my bare windows and mismatched sofa and side chairs.  If I could make all of those little things, I could make big things—like curtains and slipcovers—too.

But cotton fabrics are generally 40”, 54”, 60” or 72” wide.  And that meant I was buying alot of fabric.

That’s when I met decorator fabrics.  And then I found HarmonyArt.  These babies come in 110” widths—plenty wide for the 98” long drapes I had planned.  And you can’t deny that Harmony’s designs are gorgeous.  Perfect for curtains, tablecloths, slipcovers, and heck, if I quilted, even quilts!

The prices were much higher though.

Click over to Harmony’s blog to read the rest.  And come back on Friday to get the scoop on my latest sewing project–new curtains for my living room, using Harmony’s fabric.  Meantime, share your experiences using math in the sewing room.  What kind of math have you had to use to complete a sewing project?  Share your story in the comments section.

(Harmony and I organized a barter for this guest post; she sent me one yard of her Evelyn fabric in exchange for the post.)

You may not know this about me yet, but I’m a fabric junkie.  In fact, when I finished my book last winter, my reward was a day-trip to New York City to shop at Mood Designer Fabrics.  I need rehab. 

So when Harmony Susalla contacted me to ask if I’d do a guest post on her blog, I jumped at the chance — and I asked her to do an interview with me.  Harmony is a wonderful textile designer, who works in organic cotton.  

Can you explain what you do for a living?

As a textile designer I create patterns and designs that are printed on fabrics.  Since 2005, I have owned my own organic-cotton fabric company.

When do you use basic math in your job?

For a design to be printable using rotary screens, the design has to fit a particular circumference of the screens.  Typically the circumferences are 25.25″ or 36″.  So I use division on a regular basis because I need the repeat of the design to fit into a number that is divisible into the circumference size.   For example:  If I am using a 36″ screen then, depending on the size of the motifs, the repeat may end up being 18″ or 12″ or 9″ or 6″ or 4.5″ — or even smaller — but it must be a factor of 36.

I remember quite a few years ago I was working for a design firm and we had to do a diagonal stripe that repeated. I was doing it the hard way, meaning I would make manual adjustments, test, readjust, and test again until it eventually worked out.  My colleague and friend at the time, Freya, went home and came back the next day with a formula.   I was VERY impressed and still have that piece of paper with the formula on it.  I still reference it. But it helped me to realize that with the use of basic math skills, I could save a lot of time and effort in my work, and ensure the quality of the final design.

Also, as a small business owner, I am constantly using math to calculate charges, create order estimates, figure out cost and profit margins, determine MSRPs (manufacturer’s suggested retail price), etc.

Do you use any technology to help with this math?

Just last week, I made a spreadsheet of all of the various repeat sizes for the 25.25″ screen size. One of my customers sent me a design she wanted printed, but the design was not created in an appropriate repeat size. I had to use the list I created  in Excel to find the closest repeat-size option for her design and make the necessary adjustments.

I use QuickBooks to generate invoices which does basic multiplication and addition for me.  I also use Excel on a fairly regular basis.

These are only a few of Harmony’s designs. (Photo courtesy of Harmony Susalla.)

How comfortable with math do you feel?

On a scale of 1 to 10, I’d rate myself a 5.   I am really comfortable with simple math.  Work math seems natural. I actually really enjoy having math I learned in school apply to my daily life.  So much of our formal education is forgotten because we just don’t use it, but I get to use math on a daily basis.

What kind of math did you take in high school?

In high school, I was always in the advanced math classes. My senior year, I was placed in calculus.  Until that point, math had been pretty easy for me, but suddenly I was lost.  I think I lasted about 2 weeks before I dropped the class.  It was the first time I can remember truly feeling “stupid.”  I was then placed in regular senior math, and it was so easy that I was held after class by my teacher who believed I had an attitude problem.  While the teacher would go over homework from the day before I would be working on the current night’s homework.  I would finish before class was over, and then stare out the window (because I didn’t need help).  This was the behavior that convinced her I had an attitude problem.  After that, I had to pretend to be paying attention to the lesson being taught, even though it was material I already knew.

Did you have to learn new skills in order to do the math you use today?

This is a good question. I think that most of the math I use today I learned in school, with the exception of some of the accounting terminology and applications that were new to me. But because I had a good base in math, it was relatively easy to learn on my own.

This entire week will be devoted to fabrics. Come back on Wednesday to see what I wrote for Harmony’s blog.  On Friday, I’ll show you how I made some gorgeous curtains for my new living room out of Harmony’s Evelyn print.

In the meantime, post your questions for Harmony here. She’s happy to respond!