152 Results

math at work monday

Search

New here? You’ve stumbled upon January’s Review of Math Basics here at Math for Grownups. This week, we’re doing a quick refresher of fractions.  Monday was multiplication, so if you missed that, you might want to take a quick look before reading further. Math concepts build, you know. 

Psst! Wanna know a secret? Sure you do. So here you go: There’s a debate among math educators about whether dividing with fractions is useful at all. There. I said it. But don’t tell your kids or they might rebel.

But yes, I’m being somewhat serious here. Among math teachers who really, really think about these things — perhaps too much and I’m often in that camp — dividing with fractions is pretty much unnecessary. Okay, so you might need to divide with fractions (like when you’re halving a recipe). But while the process is stupidly simple (trust me), there are other ways to think about it that may make more sense.

Let’s take a look at that rule:

Dividing by a fraction is the same thing as multiplying by its reciprocal.

If you know what all of those words mean, you can recognize that this is pretty darned easy. But if your days in elementary school are long past, you might have forgotten what the reciprocal is. Luckily, this is no big deal. The reciprocal of a fraction is formed when you switch the numerator and denominator. In layman’s terms, you turn the fraction upside down. Like this:

It couldn’t be easier, right? So let’s put it all in context with an example.

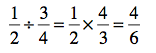
See what we did there? We turned the second fraction over and multiplied instead of divided. This is called the “invert and multiply” process. Now, all we need to do is simplify the answer.

Notice how the 4 and 6 are both divisible by 2? Well, that means the fraction can be simplified. On a 4th-grade math test, this means your teacher wants you to do more work. In the real world, it just means that the fraction will be easier to work with or even understand. (When you see the result, you’ll know what I mean.)

Doesn’t 2/3 seem a lot easier to understand than 4/6? Think of recipes. Do you have a 1/6-cup measure in your cabinet? (I don’t.)

So let’s consider how this works (or why, if you’d rather) by considering a really basic division problem: 1 ÷ 1/2.

How many ½s fit into 1? That’s the question that division asks, right? Think about those measuring cups. If you had two ½ cup measuring cups, you would have the equivalent of 1 cup. In other words:

Make sense? Now here’s another way to look at it:

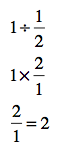
Let me summarize: 2 ½s fits into 1. In other words, 1÷ ½ is 2. And that turns out to be the same thing as multiplying by the reciprocal of ½, which is 2.

That’s a lot to take in, and you don’t have to know it by heart – or even fully understand. It just explains why this crazy rule works. And here’s another secret – there are lots of other ways to divide fractions. You can do it in your head. (It’s pretty easy to solve this problem without any arithmetic: ½ ÷ ¼. Right?) Or you could even find a common denominator (more on that Friday) and then just divide the numerators. (I’ll leave that process for you to figure out if you’re so inclined.)

The thing is, there aren’t many times in the real world that dividing by fractions is really necessary. Here’s an example to explain what I mean. Let’s say I’m cutting a recipe in half. The recipe calls for ¾ cup of sugar. How much will I actually need? Well, I can look at the question in a couple of different ways. (See which one jumps out at you.)

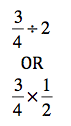
I would bet – and I can’t prove it – that most of you thought about the second option. That’s because you’re cutting the recipe in half, not dividing the recipe by 2.

In short, dividing by fractions is pretty darned simple, compared to other things you have been required to do in math. Too bad it doesn’t show up much in the real world, right?

Just for fun, try these problems on for size – using whatever method works for you. (No need to show your work!) Bonus points if you can simplify your answer, when necessary. (And no, there are no bonus points, because there are no points.)

The answers to Monday’s problems: ⅓, 4/35, 15/8 or 1⅞, 5¼, 9⅔. How did you do? ETA: Me? Not so good. I made a careless error with the last problem. The correct answer is 3 ⅔, which is explained by the comments below. 

Continuing on in our review of basic math, I welcome you to Day 2. The answers to Day 1 questions are at the bottom of the post — along with new questions. But first, let’s learn how to multiply and divide integers.

Let’s say you have a bank account with a service fee of $15 per month. If that amount was deducted every single month, how can you represent the yearly amount for these fees? Well, you would multiply -$15 (the fee is negative because it’s taken out of the account) by 12 (the number of months in the year). But how the heck do you multiply negative and positive numbers? Let’s find out.

Remember integers — those negative and positive numbers that aren’t fractions, decimals, square roots, etc.? I like to think of them as positive and negative whole numbers (though most real mathematicians would argue against that classification). On Wednesday, you learned how to add and subtract these little buggers. (Check out the post here, if you missed it.)  Today, we multiply and divide.

Her’s the really good news: it is way, way easier to multiply and divide integers than to add and subtract them. First, though, it’s a good idea to understand how the rules work. When you first started multiplying numbers, you did things like this:

2 x 3 = 2 + 2 + 2 = 6

In other words “2 x 3” is the same thing as adding up three 2s. Get it? And because you started working with positive numbers when smacking a girl upside the head meant you “like-liked” her, you know without a shadow of a doubt that the answer is positive.

Let’s see what happens when you multiply a negative number by a positive number:

-2 x 3 = -2 + -2 + -2 = -6

Now to understand this, you need to either pull up your mental number line and count or remember the addition rules from Wednesday’s post. When you add two numbers with the same sign, add the numerals and then take the sign. So -3 + -3 is -6.

But what about multiplying two negative numbers? Admittedly, this is a little trickier to explain. It helps to look for a pattern using a number line. Let’s try it with -2 x -3.

-2 x 2 = -4
-2 x 1 = -2
-2 x 0 = 0
-2 x -1 = ?
-2 x -2 = ?

Based on the pattern shown on the number line, what is -2 x -1? What is -2 x -2? If you said 2 and 4, you are right on the money.

And now we can summarize the above with some rules. Believe me, this is one math concept that is much, much easier to remember with the rules. Still, if knowing why helps anyone get it, I’m all for pulling back the curtain.

When multiplying integers:
If the signs are the same, the answer is positive;
If the signs are different, the answer is negative.

Bonus: The same rules work for division. That’s because division is the inverse (or opposite) of multiplication.

When dividing integers:
If the signs are the same, the answer is positive;
If the signs are different, the answer is negative.

The only tricky part is this: Sometimes it seems that if you are multiplying or dividing two negative numbers, the answer should be negative. It’s a trap! (Not really, but you could think of it that way, if it helps.) The key in multiplying and dividing integers is noticing whether the signs are the same or different.

In fact, if you are doing a whole set of these kinds of problems, you can simply run through the problems and assign the signs to the answers — before even multiplying or dividing. (I tell students to do this all the time, because I think it helps them to remember the rules.)

4 x -3 → signs are different → answer is negative
-4 x -3 → signs are the same → answer is positive
-4 x 3 → signs are different → answer is negative
4 x 3 → signs are the same → answer is positive

Then all you’d need to do is the multiplication itself:

4 x -3 = -12
-4 x -3 = 12
-4 x 3 = -12
4 x 3 = 12

And like I said, division works the same way:

-24 ÷ -2 = +? = 12
24 ÷ -2 = -? = -12
24 ÷ 2 = +? = 12
-24 ÷ 2 = -? = -12

Got it? Try these examples on your own.

1. 5 x -6 = ?

2. -18 ÷ 9 = ?

3. -20 ÷ -4 = ?

4. 8 x 4 = ?

5. -2 x 7 = ?

Questions? Ask them in the comments section. Up Monday are fractions. If you can’t remember how to add, subtract, multiply or divide fractions or mixed numbers, tune in. 

Answers to Wednesday’s “homework.” (It’s not really homework, I promise.) -10, -4, 2, -15, -2. How did you do?

I haven’t started my holiday baking yet, but that time is just around the corner. Today, I bring you a post from last year, Cookie Exchange Math, in which I look at the fractions involved in tripling my cow cookie — yes, I said cow cookie — recipe. If you need to feed the masses, check out an easy way to manage those pesky and sometimes strange fractions that come from increasing a recipe.

Ah, the cookie exchange!  What better way to multiply the variety of your holiday goodies.  (You can always give the date bars to your great aunt Marge.)

The problem with this annual event is the math required to make five or six dozen cookies from a recipe that yields three dozen.  That’s what I call “cookie exchange math.”

Never fear! You can handle this task without tossing your rolling pin through the kitchen window. Take a few deep breaths and think things through.

To double or triple a recipe is pretty simple — just multiply each ingredient measurement by the amount you want to increase the recipe by.  But it’s also pretty darned easy to get confused, especially if there are fractions involved.  (And there are always fractions involved.)

The trick is to look at each ingredient one at a time.  Don’t be a hero!  Use a pencil and paper if you need to.  (Better yet, if you alter a recipe often enough, jot down the changes in the margin of your cookbook.)  It’s also a good idea to collect all of your ingredients before you get started.  That’ll save you from having to borrow an egg from your neighbor after your oven is preheated.

Read the rest here — and you’ll avoid fractions-related, messy kitchen mistakes.

While you’re at it, check out this interview I did with fantastic candy-maker, Nicole Varrenti, owner of Nicole’s Treats. (I love her chocolate mustaches, personally.) It shouldn’t be any surprise that she uses math daily.

Finally, if you have some holiday-related math questions, would you mind sharing them with me? What trips you up — mathematically — at this time of year? Comment below!

I’m no big world traveler. So when faced with the prospect of filling an entire month with travel-related blog posts, I reached out to more experienced folks. Fellow freelance writer, Beth Hughes offered to write this post, detailing how she’s able to hop the globe on a limited budget. While there’s not a lot of hard math here, she does share a really smart estimation tip that helps her keep cash in her wallet–for her next trip. And you can definitely see how a little bit of planning and observation adds up to big savings. So, welcome Beth!

When I travel, I usually head to pricey places like Japan, Hong Kong and Hawaii. Yet I’ve figured out how to make these trips without breaking the bank, even when the dollar is weak. The key is planning, observing, and a little mental trickery.

Before you go

Use a travel agent. Because I usually travel with a friend, my agent, Julie Sturgeon of Curing Cold Feet, creates custom group packages for us. Savings on our last 10-day jaunt to Hawaii were about $20 each, or a tank of gas. Some years, she saves us twice that.   Savings: $20-$40

Decide how connected you must be. Free WiFi is not ubiquitous. Select a hotel with free WiFi so you can stay in touch via email and Skype if you have a smartphone or other device.  Savings: up to $20 per day

Make sure you select a hotel that equips the rooms with an electric kettle and a refrigerator. Pack food for your arrival if you’re getting in late–small cans of pop-top tuna, packs of instant oatmeal, a little jar of peanut butter and some crackers. Pack coffee or tea, and any equipment for preparing it. Savings: about $10 per day

Research the fees your bank’s ATM network, what it charges for ATM withdrawals and what service fee it tacks onto credit card purchases outside the United States. Your goal is to reduce the fee burden by withdrawing enough cash from an affiliated ATM to cover anticipated expenses for five or six days. You get a better exchange rate than you do at a moneychanger. In Tokyo recently, the airport moneychanger offered ¥71 for each US$1 while an affiliated bank’s ATM gave me ¥78. Stash the extra cash in your hotel room safe. Avoid using your credit card for a cash advance. The interest rates are punishing. Savingsup to $25

Upon Arrival

Buy a SIM card with the least expensive international call and data plan that you can top off online using a credit card. (In Japan, tourists must rent SIM cards.) The SIM card will be valid for as long as six months. You will probably leave money behind but compared with international roaming charges, it’s less than a pittance. Savings: up to $50

After a good night’s sleep,  start saving by making breakfast in your room. While this is a traveler’s tip as old as the Appian Way I figure it saved us about $200 each on a recent Tokyo stay.

Here’s how: Our budget hotel offered a daily breakfast buffet for ¥1,900 per person, or a whopping $208 per person if we had indulged for all nine mornings of our stay. So we traveled with a pound of ground coffee, which cost US$12, filters, a drip cone and our own tall, insulated travel mugs. That gave us each two cups of good coffee each morning with plenty left over for a boost if we returned in the afternoon before setting out on the night shift. We stocked up on individual yogurts, which averaged ¥100 each, spent about the same amount on fresh fruit and bought a pint of milk for coffee.

Our breakfast total per person for nine days: about ¥2,000, or $25. We’re not big breakfast eaters but if we could have added in bags of granola (¥298 per) or boxes of cereal (¥350- ¥500) and still saved. Savings: $200

Our trick for lunch in an expensive city is “Follow the office ladies!” They gravitate to good, cheap food. In Bangkok, I ended up in a utility company cafeteria that welcomed anybody who could find it, just by trailing office workers. On weekends, follow the middle-aged ladies traveling in pairs for a meal out with good chat on the side. Rarely did lunch in Tokyo cost more than $10 or $12. Wherever we ended up, and it was never a food court, we would order one of the lunch specials, always and everywhere the cheap date of meals. By making lunch the main meal of the day, we were then free to indulge ourselves with happy hours or splash out with a dainty dinner at a big-name joint. Savings: $200

Mind Trick

Now for my mind game, and yes, I am dim enough to trick myself by rounding down when making mental currency conversions(Editor’s note: I don’t think this is dim at all–but a pretty darned smart use of estimations!)

Here’s how it worked on a trip to Hong Kong, where the exchange rate has been stable for the past 10 years: US$1 converting in a narrow range to HK$7.8 to HK$7.6.

Rather than deal with decimals, I divided a price in HK dollars by US$7. This made everything from menu selections to a pink leather wallet that caught my eye seem more expensive than they were. So much for splurging in a notorious paradise for food and fashion.

I also set a daily budget. If I came in under, I didn’t automatically roll the money over to the next day. I put it in a separate pocket in my wallet. Then, when a local friend suggested a Michelin-starred restaurant for lunch, I ponied up from my secret stash.

Even with that magnificent meal, I returned home with US$279 of my budgeted travel kitty unspent. That’s a whisker less than half the cost of a ticket from the West Coast to Hawaii, and about one quarter the price of my next trans-Pacific flight. I’m thinking late November, early December before the holiday rush when the fares spike.

Do you have questions for master traveler Beth Hughes? If so, please ask in the comments section. And share your own cash-saving tips for travel!

A few weeks ago, a screen shot from Yahoo! Answers was floating around the interwebs, and a friend posted it on my facebook page asking if I would decipher it.

This is my last day of vacation, and because this question relates very well to bases (the topic of Monday’s post), I thought I’d take an easy route today and explain it. I’m guessing that many of you can see the fallacy right away, but the question speaks to how bases work (and don’t necessarily play well together).

Remember that our decimal system is in base 10. That means each place value depends on a multiple of 10: 10s, 100s, 1000s. This is also true for values smaller than 1: 10ths, 100ths, 1000ths. Got it?

Our system for measuring time is different. As the questioner correctly notes, there are 60 seconds in a minute. In fact, we measure time in base 60. Seems that this derived from the Babylonian’s astronomical calculations, a very elegant system. See, 60 is the smallest number that is divisible by the first six counting numbers: 1, 2, 3, 4, 5, 6. Neat, huh? It’s also divisible by 10, 12, 15, 20 and 30, making it an even more flexible number.

This in turn gives way to the analog clock, which is circular. Circles measure 360 degrees: base 60! In fact angles and circles are measured in base 60. (Check out this cool way to teach kids how to read an analog clock and understand circles.)

Okay, so time is measured in base 60. All that means is that 1 minute equals 60 seconds and 1 hour equals 60 minutes. (Forget the hours and days for now.) But remember, our decimal system is base 10.

And that’s where this questioner has gone wrong. You can measure time in base 10, but it won’t translate the same way as base 60. In other words, 120 seconds is not 1.2 minutes. Nope, it’s 2 minutes.

And this is exactly why it’s hard for kids to learn to read analog clocks. And why microwaves might burn brain cells along with the popcorn you were having for a snack. Even though we’ve spent our whole lives using base 60 to measure time and base 10 to measure practically everything else, sometimes it’s tough to switch back and forth. Darned Babylonians.

Have you ever gotten mixed up because time is measured in base 60? Share your story (especially if it’s travel related) in the comments section.

You’ve booked that trip to ParisVive les vacances! Now that your credit card has borne the brunt of your plane tickets and hotel reservations, with just enough space for a couple of fantastic meals, it’s time to turn to the cash. How much should you bring — and even more importantly, how far will it go?

When traveling out of country, you need to consider the currency exchange rate. Only very rarely is this exchange equal. (In other words, one Euro almost never equals one U.S. dollar.) That means, you’ll need to use a conversion to find out how far your cash will actually go.

There are actually three things to talk about here: using an online conversion calculator, doing the conversions by hand and checking your answer to see if it’s reasonable. Remember, math is infinitely flexible, so there’s no reason you have to do this in one particular way. Next Wednesday, we’ll look at doing conversions with paper and pencil. Today, it’s all about online calculators and checking your answer.

First, the conversion calculators. Go ahead and use them! If nothing else, a reliable online calculator will give you the most up-to-date conversion rate with the click of a button. For example, using the XE currency conversion calculator, I found that $1USD is equal to 0.794921€ (as of Monday, July 2, 2:05 p.m.).  This means that one U.S. dollar is worth a little more than 75 percent of a Euro.

If you know the exchange rate, it’s really easy to exchange values of 10, 100 or 1000. In these cases, you can simply move the decimal point.

$10USD = 7.94921€

$100USD = 79.4921€

$1000USD = 794.921€

Notice that when there is one zero (as in 10), you move the decimal point one place to the right. When there are two zeros (as in 100), you move the decimal point two places to the right. And when there are three zeros (as in 1000), you move the decimal point three places to the right.

Of course, if you want to convert $237.50USD to Euros, that trick won’t work. In that case, you can plug $237.50 into the online calculator. If you have $237.50USD in your pocket, that’s 188.717€.

XE also has iPhone and Droid apps, so you can take the online calculator on the road with you. (Note: I don’t have any relationship with XE. It just looks like a good, reliable online currency calculator. Want to recommend something different? Feel free to respond in the comments section.)

The thing about online calculators is that they’re only as good as the information that you put in. If you think you’re converting $USD to €, but you’re actually doing it the other way around, well, your fancy pants calculator is not going to spit out the answer you were looking for. You have to know how to assess whether your answer is correct.

I’m the first to admit that I get this very confused. I have to stop and think really hard to be sure that I’ve done the conversions correctly. (And to be honest, this is one of the reasons I prefer to do it by hand.) But there are some simple rules you can consider that will help:

  • If the conversion rate is less than 1, the conversion will be less than the original amount.
  • If the conversion rate is greater than 1, the conversion will be greater than the original amount.

Let’s say that $1USD equals $1.26SGD (Singapore dollar). If you convert $USD to $SGD, will your answer be greater or less than the original amount? If you said greater — you’re right! But if you convert $SGD to $USD, the answer will be less than the original amount. Make sense?

The good news is that you can figure this out before you leave. Write it down or keep a note on your phone. Then you will always be able to check to see if your answer makes sense. Because the worst thing is to come home from a relaxing vacation to find that you’ve spent way too much.

Be sure to come back next Wednesday to get the deets on how to do these conversions by hand. It really isn’t that difficult — and the process is applicable in so many other situations, so it’s worth learning.

Where are you traveling this summer? Share your plans in the comments section below!

On Monday, Cristina Santiestevan of Outlaw Garden shared a post about the geometry of gardening, introducing us to the idea of “hexagonal spacing.” This was such a cool idea that I thought I’d explore it further. I wanted to know the math behind it. In other words, why are hexagons so darned special?

Let’s start by with the bees. In research for a magazine assignment, I’ve done some reading about bees lately, and once again, I’m in absolute awe. These little guys are the linchpins of our ecosystem in a lot of ways. Not only does their pollen-collecting insure the reproduction of a variety of plant species (and therefore the survival of critters that depend on these plants), but their colonies are efficient little factories that seem to mirror human manufacturing — from the dance the workers do to relay directions to the best pollen to the efficiency of their job descriptions.

And then there are the hives. If you think of the bees as efficient — and they are — you can deign why the hive is made up of tiny hexagons. (Remember, a hexagon is a six-sided figure.) Not wanting to waste any space whatsoever, the bees figured it out: instead of making circular cells, which leave gaps around the sides, they create a tessellation of hexagons, which leave no empty space at all.

Photo courtesy of wildxplorer

(A tessellation is the repetition of a geometric shape with no space between the figures. Think M.C. Escher or a tile floor.)

The same concept applies to gardening. Why waste space? As Cristina pointed out, choosing a hexagon-shaped planting scheme, you’ll get more plants in your beds.  And if you’ve got an outlaw garden, like Cristina, it’s best to make the most of your space! Here’s how:

In regular rows, you plant 6″ apart in only two directions, getting nice, even rows. But if you consider six directions, you’re replicating the hexagon, instead of a square — and as a result maximizing your space (just like the honey bees). Cristina describes it as planting on the diagonal. Or you can think of each plant at the center of the hexagon.  Then you can plant the others 6″ from the center in six directions — creating the vertices of the hexagon. (If you’ve ever looked carefully at a Grandmother’s Flower Garden quilt pattern, this idea might jump out at you. Not only is each plant the center of a hexagon, but it’s also the vertex of another hexagon.)

Drawing courtesy of Cristina Santiesteven

Did you see what I did there? Math can be described in a variety of ways! Look at the second diagram carefully, and see what jumps out at you — the hexagons or the diagonal rows?

So there you have it. We can learn a lot from a bee. And I can already think of times when this can be useful in other areas. How many more cookies can you fit on a cookie sheet, if you arrange them diagonally (or in a hexagon shape) rather than horizontal rows? What about kids desks in a classroom?

Where can you apply the hexagon to make your space more efficient? Share your ideas in the comments section!

Need to make a big purchase, like a house or a car? Take out a loan. Want to go to college? Take out a loan. Need to cover other expenses, like home renovations or an adoption? Take out a loan. Want to consolidate your debts? Take out a loan.

Loans are a fact of life in our country. They’re convenient and useful. They can also be really dangerous to financial health.

And the math behind loans can be pretty daunting (which is why there are some great loan calculatorsout there on the interwebs). That’s where a teeter-totter comes in. (Stay with me on this my literal friends; it’s a metaphor.)

A formula or equation is like a teeter-totter — that piece of playground equipment that requires one person on one side and another on the other side. (You may call it a see-saw, but I think teeter-totter is a funnier word.) If an adult sits on one side of the teeter-totter, while a child is on the other side, what happens? Unless the adult is really small or the child is really big, the child will be up in the air right? In other words, the teeter-totter will not be balanced.

That’s exactly how many mathematical formulas and equations work. If you have one large variable, the outcome will likely be larger. If one of your variables is reduced, the outcome will be smaller.

(Okay, so this really depends on the operations that you’re using, which is what some of you smarty-pants math readers have already noticed. Still the idea of balancing the equation holds.)

This means that simply thinking about math concepts that define these loans can help you make smart decisions. Here’s how — without any numbers at all!

Know thy variables

As with any math application, the variables matter — big time. These are the pieces of the problem that can change from situation to situation. (Yes, they’re the letters in a formula or algebra problem, but don’t let that scare you.) Because there are so many different kinds of loans out there, paying close attention to these variables is critical.

So what are they?

1. First off, there’s the principal or the total money borrowed. This amount completely depends on what you need the funds for. You might borrow $5,000 from your home’s equity to purchase new appliances for your kitchen. You might borrow $25,000 to start a graduate or undergraduate degree. Or you might take out a $250,000 mortgage to buy a new house.

2. Next comes the interest rate or the amount that you’ll be charged periodically for the privilege of borrowing the money. Sometimes, like with federal student loans, this rate is already set. But most of the time, you can shop around for the best interest rates.

3. Then there is the term of the loan or the amount of time you’ll have to pay it off. Again, this depends on the loan itself. You may choose a 10-year, 15-year or 30-year mortgage. Your car loan may be due in full by the end of three years.

How low can you go?

These variables matter, because they determine three things: how much you’ll be paying for the loan in all, how much your monthly payments will be and how long you’ll be paying off the loan.

For most situations, it’s a good idea to keep all of these variables as low as possible. The smaller the loan, the quicker you’ll pay it off. The lower the interest rate, the less you’ll pay in all, and the shorter the term, the less interest you’ll pay.

All of this works because of math. But this is one of those situations when understanding the concept behind the math is as useful as doing the calculation itself. If you can remember how formulas work (generally speaking), you can see why it’s important to keep the variables as small as possible.

— A large loan increases the total interest (not necessarily the interest rate) and time it takes to pay it off.

— A high interest rate increases the total interest paid.

— A longer term increases the total interest paid.

Balancing the teeter-totter

Here’s where the teeter-totter comes in. If you want to pay off the loan in a short period of time, your interest rate and/or your principal must be low. If you want to borrow a large sum of money, you’re term is probably going to be longer (unless, of course, you can make really large monthly payments).

In other words, whatever you do to one side of the teeter-totter will have an effect on the other side of the teeter-totter.

Pick and choose

But one or more of your variables may be set. For example, you won’t be able to negotiate a lower college tuition (unless you choose a different school), and if you are living on a fixed income, the monthly payment you can afford will likely dictate the term of your loan.

So that’s when you need to consider how to lower the other variable(s). This is where the math comes in. If your principal is constant, try to lower the interest rate or term. If your term is set in stone, look at borrowing less or shop for a lower interest rate. And if you can’t get a smaller interest rate, consider lowering your principal or shortening the term of your loan.

See? You don’t necessarily need to scribble down the math to have an idea of how to choose a good loan. Yes, you will need to do the math at some point. But considering the basic variables in a loan can put you on the right path for making good financial decisions.

Does the teeter-totter metaphor work for you? How can you see it in other math applications? Share your stories in the comments section! (And if you have questions about the math behind loans, ask those, too.)

Quick! What’s the formula for finding the circumference of a circle? Do you remember the Pythagorean Theorem? What about the distance formula?

If you’re around my age and not a math geek, chances are the answers are “I don’t know,” “No,” and “Are you kidding me?”

When you were in school, memorizing formulas was required. But as a grownup, that’s not necessary. In fact, you can find all sorts of shortcuts that make formulas unnecessary. Here are two examples:

1. Last week, during spring break, I offered to teach my daughter and four of her friends how to make circle skirts. We bought material, set up three sewing machines and two ironing boards and got to work. I found a really wonderful (and easy) tutorial at Made, which employs a great shortcut for cutting out a circle: fold the fabric into fourths and then trace one-fourth of a circle, which will be the waist. After that, measure the length of the skirt (plus hem allowances) and trace another one-fourth circle.

We needed the radius of the smaller circle, but really all we had was the circumference of that circle — the measure around the waist. Dana at Made has a quick and easy process for this: divide the waist measurement by 6.28. Ta-da! The radius!

But why does this work? Because the circumference of a circle is C = 2πr. 2πr is approximately 6.28r. That means that you can divide the circumference by 6.28 to get the radius. Neat, huh?

2. Yesterday, I was the guest on the 1:00 hour of Midday with Dan Rodricks, Baltimore’s public radio station’s noon call-in program. Dan asked listeners to find the surface area of a cylinder with a radius of 6 and height of 8. A caller reminded me that there is a formula for this: SA = 2 π r2 + 2 π r h. But lordy, I didn’t remember that!  Instead, I found the area of each base — both circles — and the area of the rest of the cylinder (using the circumference of the base times the height of the cylinder). I added these and got the same answer.

So what’s the point? You don’t need to remember a formula. If you can break the problem down into smaller parts, do that. If it’s easier to remember to just divide or multiply by something, go for it. Unless you’re taking middle school math or have to teach a math course, the ins and outs of the formulas are not critical. What you need to be able to do is use the concepts you understand to solve the problem. Sometimes that means remember the formula, sometimes that means finding a sneaky way around your bad memory.

Don’t forget to enter the Math for Grownups facebook contest! Just visit the page to find out today’s clue (and Monday’s and Tuesday’s). Then post where you’ve noticed this math concept in your everyday life. Good luck!

Photo courtesy of potzuyoko

In our interview on Monday, professional photographer Sally Wiener Grotta talked about using histograms to help determine the exposure she needs to best reflect her subject in a photograph. If you took any statistics in high school or college — or have helped a middle schooler with her math homework — you may know exactly what a histogram is. But do you understand how these graphs are helpful for photography?

In short, a histogram is a graph that demonstrates variance and frequency.  (Stay with me here. I know there are some strange, mathy words in there.) Here’s a really simple example:

The administrators of a health clinic are collecting data about the patients, so that they can provide the most appropriate services.  The histogram below shows the ages of the patients.

Even with one quick glance, it’s apparent that the clinic sees far fewer patients who are between 80 and 90 years old. In fact, it looks like the group that’s most represented includes those between 40 and 50 years old.

(If you’re really being a smarty pants, you might notice that the histogram follows the normal or bell curve. But you don’t have to know that to get along in everyday life — unless you work in statistical analysis.)

So here’s what’s special about a histogram:

1. The horizontal line (or axis) represents the categories (or bins). These are almost always numbers, and each one has no gaps. In other words, in a histogram, you won’t have categorical data, like people’s names. Notice also that the data is continuous. Someone who is 43 and 5 months falls in the 40-50 year old category.

2. The vertical line (or axis) represents the frequency or count of each category.  These are always numbers. So in the histogram above, 40 people who visited the clinic were between 80 and 90 years old.

3.  The bars of the histogram butt up against one another. That demonstrates the fact that there are no gaps in the data and the data is numerical.

4. The taller the bar, the more values there are in that category. The shorter the bar, the fewer values there are in that category.

So let’s look at a photographer’s histogram:

First off, these histograms are automatically generated by imaging software or even some fancy-schmancy cameras. In other words, technology plots these values. It’s the photographer’s job to interpret them.

You probably noticed that there are no numbers on this histogram.  Like a statistical histogram, the vertical axis represents frequency.  But the horizontal axis doesn’t represent numbers. Instead, it shows shades.  Follow the bar at the bottom of the histogram from the left to the right.  Notice how it goes from black to grey to white? In fact, the bar gradually changes from black to white.

If you could blow up this histogram to a much larger size, you would see that it’s made up of lots and lots of skinny rectangles. These represent the number of pixels in the photograph that are each shade. So there are very few (if any) pure white pixels. There are some pure black pixels, but not as many as there are grey ones.

By glancing at this image, an experienced photographer can determine whether an image needs more or less exposure. There’s a great deal of artistry in this — a really dark photo can have a dramatic effect, while certain conditions require more exposure than others.

There you have it. Histograms aren’t just for statisticians. And those silly little graphs you drew in your middle school math class actually have artistic value!

Do you have questions about histograms? Ask them in the comments section!

Picasso’s Violin and Grapes (Photo courtesy of Ahisgett)

When my brother Graham was in kindergarten, he learned a little bit about Pablo Picasso.  And so my mother decided to take the whole family to a touring Picasso exhibit at the Smithsonian, which featured five or so of his paintings, including some of his most famous examples of cubism.

My brother is a man of few words, and he wasn’t any different as a little boy.  He quietly walked around the paintings, looking intently at them and being careful not to cross the red velvet ropes that kept out curious hands.  Nearby, we were all watching Graham, wondering what in the world he was thinking.

That’s when he stepped back from one of the paintings and said, “Oh, I get it.” We waited for something insightful. He pointed to the velvet ropes and said: “The paint is still wet.”

Cubism is not the easiest kind of art to understand.  But you have to admit — whether you like it or not — cubism catches the eye.

In cubism, objects are deconstructed, analyzed and reassembled — but not necessarily in their original order or size. When this is done in painting, the result is a three-dimensional object reassembled in a two-dimensional space, without regard to what can actually be seen in the real world.  So while you can’t see the back of a violin when you’re looking at the front, Picasso may depict the back and front at the same time in the same two-dimensional space.

Freaky, right?

I’ll leave it to the art experts to explain why this works.  But I can talk a bit about the

Portrait of Pablo Picasso by Juan Gris (Photo courtesy of Raxenne)

the geometry of cubism.

First, you need to know that cubism has its roots in the work of Paul Cezanne. He began playing with realism, saying he wanted to “treat nature by the cylinder, the sphere, the cone.”  In other words, he began replicating these figures as he saw them in his subjects.

Henri Matisse, Picasso, and others took Cezanne’s approach even further.  It’s not hard to recognize the cubes and angles and spheres and cones.  But it’s the flattening of three-dimensional space and disregard of symmetry that really distinguishes cubism from realism or impressionism.

Symmetry is a very common occurrence in mathematics.  From symmetric shapes to the symmetry of an equation (remember: what you do to one side of an equation, you must do to the other!), it’s fair to say that when symmetry is absent, it’s a big deal.

And the same is true for nature, the most often referenced subjects in art.  A face, a water lily, the body, a beetle — you could spend all day finding symmetry in the natural world.  Cubism turns this notion on its head.

And still, the pieces are compelling.  It’s that dissonance that draws our attention and even illustrates difficult subjects. (Picasso’s most enduring and controversial pieces is Guernica, a large painting depicting the Nazi bombing of a small Spanish town.)  The artists do this by breaking traditional rules and ignoring some mathematical truths.

Do you like cubism? Have a favorite artist? When you’ve seen cubism in the past, did you think of it mathematically? Buy the math books that will help you learn math for practical purposes, the math that you will use in your everyday life.

In my interview with painter, Samantha Hand, she mentioned something called the Rule of Thirds. I’ve heard of this, but I honestly had no idea what it was about.

Turns out the Rule of Thirds isn’t really about thirds, per se. Instead it’s about ninths. The idea is to divide the image into nine equal parts — something like this (Photo Credit: Lachlan via Compfight cc):

There are a couple of things to notice here. First there are exactly nine rectangles inside the one rectangle — forming a 3 x 3 grid. Second, all of the smaller rectangles are congruent, which just means they are the same size and shape. Last, each of the smaller rectangles is proportional to the larger rectangle.

What does this proportional thing mean? It’s simple, but let me explain using some numbers. Let’s say that the photo to the left measures 12 in by 6 in. (It probably doesn’t but stay with me.) From that information, we can determine the dimensions of the smaller rectangles: 12 in ÷ 3 = 4 in and 6 in ÷ 3 = 2 in. So each of the smaller rectangles is 4 in by 2 in.

If the small and large rectangles are proportional, they’ll have the same ratio. Let’s take a look:

12/6  =  2

4/2  =  2

This ratio that they have in common has a fancy name: the scale factor. (And if you know anything about drafting or making scale models, that will be familiar.)

Now before we get too far into this, let me say that Samantha — and most painters and photographers who might use the Rule of Thirds — isn’t thinking about proportion and scale factor. But this a good example of when proportions are important and intuitive.

So getting back to the Rule of Thirds — according to some research, people’s eyes are naturally drawn to where the grid lines intersect. A painter can use this information to draw viewers into the painting, especially if there are surprising elements or those that should have more emphasis. Take a look at Da Vinci’s The Last Supper.

Image courtesy of Atelier Mends

Notice how the table itself sits along the bottom horizontal line. The left vertical line crosses Judas, Peter and John, and the right vertical line crosses Thomas, James and Philip. Interestingly, the greatest tension in the piece is at these two points, while Jesus occupies the exact center of the painting with a calm demeanor.  Whatever your religious beliefs are, the story this painting tells is furthered by Da Vinci’s use of the Rule of Thirds.

In a couple of weeks, you’ll meet a photographer who probably also uses the Rule of Thirds in her work.  In the meantime, see if you can superimpose an imaginary 3 by 3 grid over your favorite paintings or photographs.  How does the Rule of Thirds draw you into the piece? How does it help you notice important or surprising details?

Have you noticed the Rule of Thirds in paintings that you love?  Share your thoughts in the comments section!